But if you want to know how I really feel
Get the cameras rollin'
And get the action goin'
Get the cameras rollin'
And get the action goin'
I had settled in to a good rhythm on two projects, alternating between assembly of a bass guitar from an assortment of bits and pieces and a 6-string acoustic-electric prototype build. A wave of warm weather was in the forecast for this week, and I planned on taking it easy until the humidity broke later in the week week. Instead, a coworker asked me to do some work on one of his mandolins. The job was to install a pickup in a Collings MT, and it needed to be done within the week so the owner could use it at a rehersal. The owner chose K&K's Twin Internal for this application so the output jack would be concealed as an endpin when not plugged in to an amplifier. All of the work was to be done through the endpin and f-holes, without removing the back panel. Here's a view of one installed on a mandolin with the back removed.

The high humidity did not help in removing the stock plastic endpin. The safest and easiest way to remove a tight endpin is by drilling it out.


The holes through the body and tailpiece both needed to be enlarged to just under 1/2-inch diameter to accommodate the output jack. I mounted a step-type reamer on my drill to work on the tailpiece, and switched the reamer into a handle to work on the body.


I used some nylon fishing line for pulling a thin piece of insulated wire through one of the sound holes and back out through the end pin hole. The wire is what I used later to pull the output jack in place.

The K&K kit included an ample amount of double-stick adhesive tape for adhering the transducers to the inside of the front panel. The kit also included a "tool," a.k.a. a bent nail and reusable putty, for working through the florentine holes.

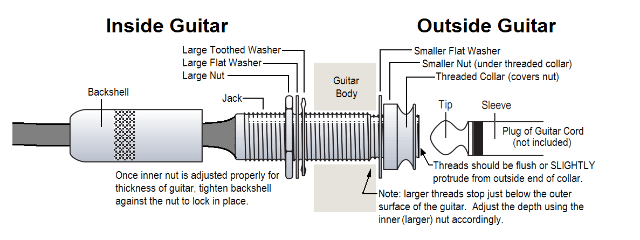
Setting the correct endpin jack length is similar to how it is done with some guitar endpin jacks as shown below, by adjustment of the nut on the inside of the end block. With access to the inside of the instrument limited to the sound holes and the endpin hole, this is done by trial and error with repeated removal and re-installation of the jack through a sound hole. The threaded collar acts as the strap pin as well to conceal the outer nut, so the collar is the last piece to go on. The jack is properly installed when the threads of the jack are just proud of the threaded collar.

After restringing, some polishing and testing through an amplifier, this mando was returned to its owner on a Wednesday, in plenty of time for a Thursday night rehersal.

No comments:
Post a Comment