Tuesday, July 26, 2011

Harmony H1203 Sovereign - Beginning the Rebuild

It was June, and the heat in my shed was already starting to be unbearable in the daytime hours.  But, after months of research, deconstruction and prep work, it was finally time to start the rebuild!


Back in the early 1980's, when I built that classical Torres-style guitar, we did not have the Internet.  What I had to go by were some pictures and drawings I found in the SUNY-Binghamton library, and the advice of Associate Professor John Thompson.  I took two studio art courses with John before approaching him to be my advisor for this independent study.  In addition to teaching art, John played and made violins and other musical instruments, and was interested at the time in making a line of musical instrument kits.  Besides earning a grade for me, we figured the build would provide an opportunity for John to make some decisions on how to split up the kit build into what would be done in manufacturing and what would be left to the builder.

1984 Torres-style guitar.  Rosewood back, sides, neck.  Sitka Spruce top.


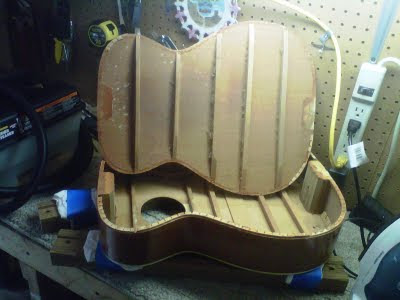
How we attached the front and back panels to the sides of that classical guitar is something I have forgotten over the years.  Considering that John built violins, my guess is that we used lots of spool clamps.  After building some spool clamps for the Sovereign, I did a dry fit.  To be sure I had enough to go all the way around the edge, and to be sure to clamp up the full surfaces of the neck and end blocks, I used a pair of quick clamps at each block.


Next, I removed the clamps, and put on some tape to protect the sides and front binding during full force clamping.


I found out pretty quickly how much things slide around with wet glue, so I used another pair of quick clamps at her waist to help hold things steady while putting on the spool clamps.


With the rest of the spool clamps in place, I replaced the bar clamps at her waist with spool clamps.  After cleaning up the excess glue from the edge, I left her alone to let the glue dry.


The next evening, I was very disappointed to find that my spool clamping did nothing to counter the sliding effect in a few spots.  In the picture below, you can see how the back panel is shy of the side at one of the bouts.  The slippage in the joint varied as much as 1/8", too much to be properly concealed with binding. 


After researching and designing a better clamping method, I removed the back for the second time.  Getting the back off without letting the heat of my iron detach the braces from the back panel was a bit more challenging.  All went well, and the only collateral damage she suffered was a bit of lining near the neck block. I made a replacement from some scrap spruce, glued it on, and shaped and sanded it while preparing the back panel and the rest of the linings for glue.  With some additional compression clamps made from wood scraps and threaded rod, I tweaked the shape of the body and put the glue on for the second time.


With the glue dried and clamps off, I was pleased to see a slight overhang of the back panel over the sides.


Unfortunately, a few inches at the two lower bouts got pushed out, leaving me with what was there last time:


Disappointed, I considered my options. First, I could try to conceal the joint with a second strip of binding.  That wasn't very appealing, considering I wasn't even sure how well I could apply one layer of binding, and the majority of the joint did not require this treatment.  Determined to get it right, I decided to try a technique known as slipping the heel. In researching this technique, I found it is sometimes performed at the neck joint of classical guitars, or on steel string guitars instead of performing the more invasive neck reset, to reduce high action.  In effect, the block is pushed inward at the back panel, the overhanging panel is trimmed, and cosmetic repairs are made to the finish to hide the repairs.  Similarly, I detached the back panel at the two lower bouts and the end block, just enough to be able to tweak the sides to that the back panel would overhang the sides as they already were at the rest of the panel.


I applied the glue and set a few more strategically placed compression clamps, a half dozen quick clamps and a strap clamp.


Even while clamping it up, I could tell there would still be two spots at the lower bouts where the binding would reveal some misalignment.  After the glue dried, I removed the clamps and thought about taking a small break from this part of the rebuild to regroup my thoughts.   The heat of the July summer in North Carolina helped convince me this was the best thing to do.

Wednesday, July 13, 2011

Harmony H1203 Sovereign - Braces & A Bridge Plate Mod

While working on this project, Jorma Kaukonen's arrangement of a Rev. Gary Davis song came to mind.  It seems appropriate for this old guitar:


One thing I learned when rebuilding this guitar is how much of a misnomer "flat top" really is.  In fact, a guitar is made up of so many curves, I believe it is more difficult to reassemble one than it is to build it the first time.  Although some of the tools and techniques used are the same, there are two very different mindsets and limitations involved.  Like my fellow engineers and contractor brethren, my guess us some luthiers are better at building new, while others are better at repairs.

There were two types of back repairs to be made.  The easier ones were what I call split ends, and at least one may have been a result of some of my amateurish dis-assembly tools and techniques.  To repair the split ends, I broke them open just enough to make sure had good gluing surfaces.  I cleaned the old glue off of them with a little more steam and some light sanding, being careful to keep the edges square and preserve the curvature where they meet the back panel.


In order to let the ends of the braces into the kerfing, I needed the braces to be a little bit longer so that the ends would reach the edges of the back panel.  One option was to replace all of the braces, but I knew it was impossible to find the same wood, and I was concerned that introducing a different wood in all of the back braces might alter the tone.  By shifting the brace locations, I could reuse all but one of the original braces.  The solution was to replace the other brace with one made of a stronger but thinner piece of wood, so the difference in tone would be minimized.  With a few clamps and some scrap wood, I started by gluing and clamping the two reused braces closest to her waist.  Each of these needed to be shifted less than a half inch towards the waist to get their ends to meet the back panel edge.


I used hide glue, so I allowed the glue to dry for at least 24 hours before unclamping.  The next brace was at the lower bout closets to the end block, since it also needed to be shifted less than a half inch towards the end block.  With that one in place, I added the longest one, a new oak brace, at the full width of the lower bout.


I put the shortest brace aside, and used the original long brace to replace the one at the waist.  With all of the braces attached, I masked off the back panel and used a sanding block to smoothen off just the rough edges of the braces.  Their stoutness was not something I wanted to change, but they appeared as if they had never been sanded during original assembly.  I took off just enough to expose fresh lumber.  The aroma of 50-ish year old rosewood was an inspiration.


With all of the braces sanded, I gave the inside of the back panel one last light sanding, just enough to completely remove the patterning left from the old brace locations.


Next, I transferred the new brace locations onto the sides with pencil, to locate where the notches needed to be. Due to the curvature, I had to use some tape to help hold things in place.  Then, with a straight edge, I transferred those marks onto the faces of the kerfings with a black marker.


Using my Dremel with a rotary cutting attachment followed by some hand sanding, I made notches in the kerfing and sides, and stopped when it seemed I had gotten the back and sides to mate up well.


There was also one issue on the front panel to be handled before gluing on the back panel.  I turned my attention to the flimsy bridge plate I had removed and set aside.  Like with the back braces, I did not want to make any drastic changes that might affect the tone.  Applying a little structural engineering, I made a set of transverse braces that I attached to the two braces adjacent to the bridge.  Slots in the transverse braces trap a very short and stiff oak bridge plate, converting the twisting from the bridge into a pair of forces that get transferred into the ladder bracing.  Although this approach has something in common with the Gibson L-0 and L-1 models, played by delta blues legends such as Robert Johnson, my research indicates this is a unique solution as a repair to a ladder-framed guitar top.  For sure, it is a whole lot simpler, and truer to the original design, than replacing all of the top bracing with a modern X-bracing design!  The next picture shows my first pass at this with roughly shaped oak transverse braces and bridge plate.


The Gibson L-0 and L-1 top bracing was a two-way reinforcing system that combined design elements from both archtop and flat top bracing practices common in the early 1920's.  This bracing design was abandoned after a few years of production and was replaced with X-bracing.

Photo used with permission from: http://hamlettinstruments.com/repair-services/gibson-l-0

After cutting and fitting the braces and bridge plate, I used some clamps to pre-assemble the new pieces and allowed the glue to dry.


After a final fitting, I made a jig and some cauls to clamp the assembly in place.


After the glue dried, I set the top aside and started in on making two dozen spool clamps from oak dowels, felt pads and some threaded hardware.


Before gluing the back on, I gave the sides and top a final clean-up sanding and made a few minor remaining repairs to the end block, kerfing and the loosened joint between the top plate and end block.  Some scrap spruce with hide glue was adequate for replacing a few inches of kerfing in various locations.  I using some epoxy to graft a piece of oak to the end block where I had done some damage during the removal of the back panel.  A scrap piece of  2x4 attached to my neck separation jig came in handy for clamping up the repair to the top plate and end block joint.


Saturday, July 9, 2011

Harmony H1203 Sovereign - Odds and End Pins

I stand it all and I shake my face 
You break your promise all over the place


Summer is in full swing here in North Carolina, and I'm not spending as much time as I'd like on this rebuild.  It's just too hot to work for more than an hour at a time in my shed with our summer weather.  So, I've been spending some of my free time updating this blog with the rest of the dis-assembly process.

While taking this old guitar apart, I took care of a few things that are worth mentioning.  In fact, in between taking the back off and taking the braces off of the back panel, I reassembled the neck.  But, to make this blog easier to follow, I am showing the process in a more linear way.

The bone nut and saddle cleaned up well with some steam, a Dremel grinding attachment and some fine sandpaper.  The nut appeared good enough for reuse, and it will get some final work when I put strings on this old guitar to check the action.  The old saddle had been trimmed so far down that some of the strings were in contact with the bridge, so it was way too short to be reused.  The new bone saddle blank is much higher and thicker, and will take some work to make it fit in the existing bridge slot.


This old guitar had a really cheap-looking celluloid end pin, and I just don't like the way a bone end pin looks.  The rosewood end pin I found matches the bridge, back and sides, and has a little dot inlay that matches the fretboard dot inlays.


The little loose sliver of wood at the left of the next picture is a hardwood shim.  It did its job for awhile.  Shims get soaked with glue, so they are not reusable.  I made some oak shims to use in the dovetail joint during the neck reset.


I found a good deal for a set of gold-plated Imperial style tuners on eBay.  The original pegs work, but I wanted to spruce her up a bit.  After the Imperial set arrived, I decided they were too ostentatious for this guitar.  Instead, I played musical chairs with tuners on three guitars.  The Imperial set ended up on my Holiday Archtop, the gold-button Grover look-alike set that was on my Holiday is now on my Samick Dreadnought, and the real Grover nickel button set from my Samick will be on this old guitar.  I overbored the holes in the head stock and put the tuners in temporarily to see how they will look.  Which do you think looks better, the ones in the first picture or the set in the second picture?


The new ivory colored celluloid binding I found is a few shades lighter than the existing binding.  The options of staining the binding and mixing tint into clear lacquer did not pan out, as I could not find materials that seemed to be compatible, and I did not want to risk damaging the new binding or existing finish.  I picked up some clear lacquer in a spray can at my local woodworking supply store to put on over the new binding, and will live with it.  Fortunately, It's just the back panel.


Since I had the neck open to work on the truss rod, and the old one-way rod had to be replaced, I opted to put in a two-way adjustable truss rod.  I figured this might also come in handy since the neck might be in need of some artificial relief by the time I got through with it.  The rod I found was just a fraction of an inch longer than the original, and the channel needed to be cut just a little wider and deeper to accommodate the larger shafts of the new rod.


I used a drill bit to get it started, and finished up the process with a thin sanding block.  The new rod has a square tube steel upper bar, so it was easy to get a good snug fit that also left plenty of room for the blue lower rod to turn freely.


After reinstalling the fret wire I had pulled from the15th fret, I moved on to reassembling the rest of the neck.  To keep the glue from getting where it did not belong, I covered much of the headstock and neck with masking tape.  To hold the fretboard and nut in place while the glue dried, I used wooden shims, zip ties and an assortment of spring clamps and quick-clamps.


After letting all the hide glue dry, I removed all of the clamps shims and tape.  Next, I covered the wood of the fingerboard and the binding strips with more tape so I could do a little work on the frets.  They seemed to be in good enough shape to be left in and reused, so some mild reshaping with a sanding block is all I did to them.  I made the last passes of the sanding block with fine sandpaper, just enough to get all of the frets down to clean, shiny metal.


Removing the masking tape helped clean off the neck, especially on the headstock.  After it was all off, I buffed some shine back into her finished surfaces with some Murphy's Oil Soap.  I'll touch up where the fretboard binding meets the edges of the neck with some spray lacquer when I'm ready to do the same with the new back binding.


But, before doing any binding and lacquer work, I still have to finish resetting the neck dovetail joint with new shims.  I've already done the work on the bridge plate and back braces, and reattached the back panel to the sides.  If the weather next week keeps up the way it has been here in North Carolina, I'll likely have an opportunity to spend some time instead making a post here showing how the braces and back went back together on this old guitar.

Wednesday, July 6, 2011

Harmony H1203 Sovereign - A Slow Deconstruction


During one summer in the mid 1970's, a guitar-playing childhood friend introduced me to John Denver's music.  The song "Thank God I'm a Country Boy" was on Denver's 1974 Back Home Again album.  The forth verse sums up the way I feel about my hobbies and pastimes:


I'd play "Sally Goodin'" all day if I could
But the Lord and my wife wouldn't take it very good
So I fiddle when I can, work when I should
Thank God, I'm a country boy

One of the reasons I thought this would be too large of a project was because of the amount of time I figured it would take.  Between working full time, being a husband to my wife of 20+ years, being a dad to two children, and all that comes along with those roles, it has been a struggle to find even a few hours some weeks to put into this old guitar.  Because of the time factor, I started documenting this project with pictures to keep me focused, which has turned into writing this blog months after starting the project.  Writing this blog has also been a way for me to keep connected the project when I haven't been able to work on it.  After letting her hang on the wall for almost a year, I stated working on this old guitar in the fall of 2010, about eight months prior to publishing Part I.  It's been an interesting journey and learning experience so far, and just getting past the deconstruction and in to the rebuild has already been a lot of fun.


One of the major repairs this old guitar needed was a neck reset, and I decided removing the neck was a good place to start on this project.  From my research, an espresso machine is commonly used as a steam source to apply heat needed to melt the hide glue used to build musical instruments.  Being new to this, I didn't know how much steam I might need, and didn't want be limited by the size of a small espresso water tank.  So, I decided on something with a larger reservoir, and bought a Wagner 705 Power Steamer wallpaper remover.  After fitting an inflation needle to the end of the hose with a compression fitting and some two-part epoxy, I was officially in the steam business.


Before I could use my new tool, I had to do two other things.  First, I needed to drill an access hole into the dovetail joint for injecting the steam into the joint.  Second, I needed to build a jig to push the neck out of the joint.  I carefully removed the 15th fret so I could drill the access hole.


The hole I drilled was just the right size for the inflation needle, but the bit felt way too solid going past the first quarter inch and pulled out lots of lighter colored woods from the first quarter inch underneath the fretboard.  Although the scent of these 50-ish year old woods was great, it also told me I did not hit the void in the dovetail joint.  To replace the truss rod, the entire fretboard would have to come off.  So, applying the heat of a clothes iron on to the frets and using some putty knives to separate the pieces, I carefully removed the entire fretboard from the body and neck.  Fortunately, the edge binding remained intact.


With the fretboard out of the way, I could confirm the drill had gone into the end block instead of the joint, and heating up the glue in the dovetail joint became an simpler task.


With some scrap metal beams, 1x4's and some hardware, I made a jig for pressing the neck out of the joint.


With less than a minute of steam, and a few effortless turns of the wrenches, the neck slid right out of the dovetail joint without damaging the neck or neck block.


After cleaning out the dovetail joint with some steam, I turned my attention to the neck and used some steam to clean off the excess glue.  Next, I found that the one-way truss rod was stuck solid in its channel and very rusted.  A combination of rust from excess moisture and over-tightening are probably what caused the truss rod to break.  With a couple of taps from a hammer on an old screwdriver, the rod and bushing popped cleanly out without damaging the neck.


To get at the loose back bracing and thoroughly check out the insides, it was necessary to remove the back binding and the back panel.  It would have been nice if the binding had come off in a few pieces, but it did not happen that way.   After some failed attempts at cutting away the back panel binding with a razor blade and a straight knife, I started using a Dremel. The binding came off in many small pieces, too small to salvage.  I eventually used the Dremel attachments on my DeWalt drill to finish the job.


To remove the back panel, I used a clothes iron again.  This time, I used an old towel between the iron and the guitar to protect the finish.  With some heat and some patience, the glue melted just enough to separate the perimeter joint easily with a pair of putty knives.


The sides and kerfed lining split and separated in a few spots, but they would be easily repaired.  One detail I did not like about this old guitar was that the back braces were not notched into the linings.  That's something I modified during the rebuild, to add some strength to this old guitar.


After warming up the power steamer again, I took the back braces off and steam cleaned some of the old glue and dirt off of the back panel.  The smell of 50-ish year old old hide glue and wood was delightful.


After a good cleaning and thorough inspection of the insides , I was disappointed to find no traces of a model number or date stamp.  On the brighter side, she also had no damaged or loose top braces.  As for her original bridge plate, it was just a thin piece of spruce that was no longer attached well, and like the back braces was not notched into the linings.  This meant that, by design, the front panel had no assistance to keep it from rotating between the two nearest ladder braces.  This is an inherent weakness of ladder braced front panels that can eventually result in deformed top panels like this one was already showing.  I've come across a few shops that offer bracing conversion services, but that seemed too risky to me at the time.  Although I did not want to get into replacing the front bracing with a more modern X-braced pattern, I decided to try a simpler modification to the bridge plate and adjacent bracing during the rebuild.  With a little more steam and a putty knife, I took out the original bridge plate just after taking this picture.


With the neck, back and back bracing off, I was ready to start in on the long list of repairs to be made to this old guitar.